windows stores its passwd in file
c:\windows\system32\config\sam
B4 SP1 u could reset passwd by just deleting Dis file
find prices of hardware
www.priceindia.in/computer/motherboard-price-list/
note: prices may vary with reagion to reagion.
note: prices may vary with reagion to reagion.
Get the serial number you need ! (For Certain Things)
* Go to Google.
* In the search field type: "Product name" 94FBR
* Where, "Product Name" is the name of the item you want to find the serial number for.
* And voila - there you go - the serial number you needed.
HOW DOES THIS WORK?
Quite simple really. 94FBR is part of a Office 2000 Pro cd key that is widely
distributed as it bypasses the activation requirements of Office 2K Pro. By searching
for the product name and 94fbr, you guarantee two things. 1) The pages that are
returned are pages dealing specifically with the product you're wanting a serial for.
2) Because 94FBR is part of a serial number, and only part of a serial number, you
guarantee that any page being returned is a serial number list page.
See these example searches:
"Photoshop 7" 94FBR
"Age of Mythology" 94FBR
"Nero Burning Rom 5.5" 94FBR
10 reasons why PCs crash U must Know
Fatal error: the system has become unstable or is busy," it says. "Enter to return to Windows or press Control-Alt-Delete to restart your computer. If you do this you will lose any unsaved information in all open applications."
You have just been struck by the Blue Screen of Death. Anyone who uses Mcft Windows will be familiar with this. What can you do? More importantly, how can you prevent it happening?
1 Hardware conflict
The number one reason why Windows crashes is hardware conflict. Each hardware device communicates to other devices through an interrupt request channel (IRQ). These are supposed to be unique for each device.
For example, a printer usually connects internally on IRQ 7. The keyboard usually uses IRQ 1 and the floppy disk drive IRQ 6. Each device will try to hog a single IRQ for itself.
If there are a lot of devices, or if they are not installed properly, two of them may end up sharing the same IRQ number. When the user tries to use both devices at the same time, a crash can happen. The way to check if your computer has a hardware conflict is through the following route:
* Start-Settings-Control Panel-System-Device Manager.
Often if a device has a problem a yellow '!' appears next to its description in the Device Manager. Highlight Computer (in the Device Manager) and press Properties to see the IRQ numbers used by your computer. If the IRQ number appears twice, two devices may be using it.
Sometimes a device might share an IRQ with something described as 'IRQ holder for PCI steering'. This can be ignored. The best way to fix this problem is to remove the problem device and reinstall it.
Sometimes you may have to find more recent drivers on the internet to make the device function properly. A good resource is www.driverguide.com. If the device is a soundcard, or a modem, it can often be fixed by moving it to a different slot on the motherboard (be careful about opening your computer, as you may void the warranty).
When working inside a computer you should switch it off, unplug the mains lead and touch an unpainted metal surface to discharge any static electricity.
To be fair to Mcft, the problem with IRQ numbers is not of its making. It is a legacy problem going back to the first PC designs using the IBM 8086 chip. Initially there were only eight IRQs. Today there are 16 IRQs in a PC. It is easy to run out of them. There are plans to increase the number of IRQs in future designs.
2 Bad Ram
Ram (random-access memory) problems might bring on the blue screen of death with a message saying Fatal Exception Error. A fatal error indicates a serious hardware problem. Sometimes it may mean a part is damaged and will need replacing.
But a fatal error caused by Ram might be caused by a mismatch of chips. For example, mixing 70-nanosecond (70ns) Ram with 60ns Ram will usually force the computer to run all the Ram at the slower speed. This will often crash the machine if the Ram is overworked.
One way around this problem is to enter the BIOS settings and increase the wait state of the Ram. This can make it more stable. Another way to troubleshoot a suspected Ram problem is to rearrange the Ram chips on the motherboard, or take some of them out. Then try to repeat the circumstances that caused the crash. When handling Ram try not to touch the gold connections, as they can be easily damaged.
Parity error messages also refer to Ram. Modern Ram chips are either parity (ECC) or non parity (non-ECC). It is best not to mix the two types, as this can be a cause of trouble.
EMM386 error messages refer to memory problems but may not be connected to bad Ram. This may be due to free memory problems often linked to old Dos-based programmes.
3 BIOS settings
Every motherboard is supplied with a range of chipset settings that are decided in the factory. A common way to access these settings is to press the F2 or delete button during the first few seconds of a boot-up.
Once inside the BIOS, great care should be taken. It is a good idea to write down on a piece of paper all the settings that appear on the screen. That way, if you change something and the computer becomes more unstable, you will know what settings to revert to.
A common BIOS error concerns the CAS latency. This refers to the Ram. Older EDO (extended data out) Ram has a CAS latency of 3. Newer SDRam has a CAS latency of 2. Setting the wrong figure can cause the Ram to lock up and freeze the computer's display.
Mcft Windows is better at allocating IRQ numbers than any BIOS. If possible set the IRQ numbers to Auto in the BIOS. This will allow Windows to allocate the IRQ numbers (make sure the BIOS setting for Plug and Play OS is switched to 'yes' to allow Windows to do this.).
4 Hard disk drives
After a few weeks, the information on a hard disk drive starts to become piecemeal or fragmented. It is a good idea to defragment the hard disk every week or so, to prevent the disk from causing a screen freeze. Go to
* Start-Programs-Accessories-System Tools-Disk Defragmenter
This will start the procedure. You will be unable to write data to the hard drive (to save it) while the disk is defragmenting, so it is a good idea to schedule the procedure for a period of inactivity using the Task Scheduler.
The Task Scheduler should be one of the small icons on the bottom right of the Windows opening page (the desktop).
Some lockups and screen freezes caused by hard disk problems can be solved by reducing the read-ahead optimisation. This can be adjusted by going to
* Start-Settings-Control Panel-System Icon-Performance-File System-Hard Disk.
Hard disks will slow down and crash if they are too full. Do some housekeeping on your hard drive every few months and free some space on it. Open the Windows folder on the C drive and find the Temporary Internet Files folder. Deleting the contents (not the folder) can free a lot of space.
Empty the Recycle Bin every week to free more space. Hard disk drives should be scanned every week for errors or bad sectors. Go to
* Start-Programs-Accessories-System Tools-ScanDisk
Otherwise assign the Task Scheduler to perform this operation at night when the computer is not in use.
5 Fatal OE exceptions and VXD errors
Fatal OE exception errors and VXD errors are often caused by video card problems.
These can often be resolved easily by reducing the resolution of the video display. Go to
* Start-Settings-Control Panel-Display-Settings
Here you should slide the screen area bar to the left. Take a look at the colour settings on the left of that window. For most desktops, high colour 16-bit depth is adequate.
If the screen freezes or you experience system lockups it might be due to the video card. Make sure it does not have a hardware conflict. Go to
* Start-Settings-Control Panel-System-Device Manager
Here, select the + beside Display Adapter. A line of text describing your video card should appear. Select it (make it blue) and press properties. Then select Resources and select each line in the window. Look for a message that says No Conflicts.
If you have video card hardware conflict, you will see it here. Be careful at this point and make a note of everything you do in case you make things worse.
The way to resolve a hardware conflict is to uncheck the Use Automatic Settings box and hit the Change Settings button. You are searching for a setting that will display a No Conflicts message.
Another useful way to resolve video problems is to go to
* Start-Settings-Control Panel-System-Performance-Graphics
Here you should move the Hardware Acceleration slider to the left. As ever, the most common cause of problems relating to graphics cards is old or faulty drivers (a driver is a small piece of software used by a computer to communicate with a device).
Look up your video card's manufacturer on the internet and search for the most recent drivers for it.
6 Viruses
Often the first sign of a virus infection is instability. Some viruses erase the boot sector of a hard drive, making it impossible to start. This is why it is a good idea to create a Windows start-up disk. Go to
* Start-Settings-Control Panel-Add/Remove Programs
Here, look for the Start Up Disk tab. Virus protection requires constant vigilance.
A virus scanner requires a list of virus signatures in order to be able to identify viruses. These signatures are stored in a DAT file. DAT files should be updated weekly from the website of your antivirus software manufacturer.
An excellent antivirus programme is McAfee VirusScan by Network Associates ( www.nai.com). Another is Norton AntiVirus 2000, made by Symantec ( www.symantec.com).
7 Printers
The action of sending a document to print creates a bigger file, often called a postscript file.
Printers have only a small amount of memory, called a buffer. This can be easily overloaded. Printing a document also uses a considerable amount of CPU power. This will also slow down the computer's performance.
If the printer is trying to print unusual characters, these might not be recognised, and can crash the computer. Sometimes printers will not recover from a crash because of confusion in the buffer. A good way to clear the buffer is to unplug the printer for ten seconds. Booting up from a powerless state, also called a cold boot, will restore the printer's default settings and you may be able to carry on.
8 Software
A common cause of computer crash is faulty or badly-installed software. Often the problem can be cured by uninstalling the software and then reinstalling it. Use Norton Uninstall or Uninstall Shield to remove an application from your system properly. This will also remove references to the programme in the System Registry and leaves the way clear for a completely fresh copy.
The System Registry can be corrupted by old references to obsolete software that you thought was uninstalled. Use Reg Cleaner by Jouni Vuorio to clean up the System Registry and remove obsolete entries. It works on Windows 95, Windows 98, Windows 98 SE (Second Edition), Windows Millennium Edition (ME), NT4 and Windows 2000.
Read the instructions and use it carefully so you don't do permanent damage to the Registry. If the Registry is damaged you will have to reinstall your operating system. Reg Cleaner can be obtained from www.jv16.org
Often a Windows problem can be resolved by entering Safe Mode. This can be done during start-up. When you see the message "Starting Windows" press F4. This should take you into Safe Mode.
Safe Mode loads a minimum of drivers. It allows you to find and fix problems that prevent Windows from loading properly.
Sometimes installing Windows is difficult because of unsuitable BIOS settings. If you keep getting SUWIN error messages (Windows setup) during the Windows installation, then try entering the BIOS and disabling the CPU internal cache. Try to disable the Level 2 (L2) cache if that doesn't work.
Remember to restore all the BIOS settings back to their former settings following installation.
9 Overheating
Central processing units (CPUs) are usually equipped with fans to keep them cool. If the fan fails or if the CPU gets old it may start to overheat and generate a particular kind of error called a kernel error. This is a common problem in chips that have been overclocked to operate at higher speeds than they are supposed to.
One remedy is to get a bigger better fan and install it on top of the CPU. Specialist cooling fans/heatsinks are available from www.computernerd.com or www.coolit.com
CPU problems can often be fixed by disabling the CPU internal cache in the BIOS. This will make the machine run more slowly, but it should also be more stable.
10 Power supply problems
With all the new construction going on around the country the steady supply of electricity has become disrupted. A power surge or spike can crash a computer as easily as a power cut.
If this has become a nuisance for you then consider buying a uninterrupted power supply (UPS). This will give you a clean power supply when there is electricity, and it will give you a few minutes to perform a controlled shutdown in case of a power cut.
It is a good investment if your data are critical, because a power cut will cause any unsaved data to be lost.
Mozilla Firefox Tips
Once it Opens You should see similar to the following screen
Tip1
In the filter bar type network.http.pipelining
You should see the following screen
Normally it says ” false ” under value field , Double click it so it becomes ” true “.
Once you finished this you should see the following screen.
Tip2
In the filter bar again and type network.http.pipelining.maxrequests
Once it Opens You should see the following screen
Default it says 4 under value field and you need to change it to 8
Once you finished this you should see the following screen.
Tip3
Go to the filter bar again and type network.http.proxy.pipelining
Once it Opens You should see similar to the following screen
Normally it says ” false ” under value field , Double click it so it becomes ” true “.
Once you finished this you should see the following screen.
Tip4
Go to the filter bar again and type network.dns.disableIPv6
Once it Opens You should see the following screen
Normally it says ” false ” under value field , Double click it so it becomes ” true “.
Once you finished this you should see the following screen.
Tip5
Go to the filter bar again and type plugin.expose_full_path
Once it Opens You should see the following screen
Normally it says ” false ” under value field , Double click it so it becomes ” true “.
Once you finished this you should see the following screen.
Tip6
Now you need to Create new Preference name with interger value for this got to Right click -
New -> Integer
Once it opens you should see the following screen
Here you need to type nglayout.initialpaint.delay and click ok
Now you need to enter 0 in value filed and click ok
Once you finished this you should see the following screen.
Tip7
Now you need to Create one more Preference name with interger value for this got to Right click ->New -> Integer
Once it opens you should see the following screen
Here you need to type Content.notify.backoffcount and click ok
Now you need to enter 5 in value filed and click ok
Once you finished this you should see the following screen.
Tip8
Now you need to Create one more Preference name with interger value for this got to Right
click -> New -> Integer
Once it opens you should see the following screen
Here you need to type ui.submenuDelay and click ok
Now you need to enter 0 in value filed and click ok
Once you finished this you should see the following screen.
Firefox Memory Leak Fix
Open a new tab. Type “about:config” without quotes into the address bar and hit enter/click Go. Right-click anywhere, select New, then Integer.
In the dialog prompt that appears, type:browser.cache.memory.capacity
Click OK. Another dialog prompt will appear.
This is where you decide how much memory to allocate to Firefox.
This depends on how much RAM your computer has, but generally you don’t want to allocate too little (under 8MB), but if you allocate too much, you might as well not do this.
A good recommended setting is 16MB. If you want 16MB, enter this value into the dialog prompt: 16384 (Why 16384 instead of 16000? Because computers use base-12 counting.Thus 16 megabytes = 16384 bytes. Likewise, if you want to double that and allocate 32MB, you’d enter 32768.)
Click OK to close the dialog box, then close all instances of Firefox and restart. If your Firefox still uses the same amount of memory, give it a few minutes and it should slowly clear up. If that fails, try a system reboot.
Now your Firefox will now be 3 - 30 times faster in loading pages.
Website That Helps You Slove Maths ProblemsNeed to Maths formulas
then visit-
1. Math.com
2. Sosmath.com
3. Eformulae.com
4. Math2.org
1. Math.com
2. Sosmath.com
3. Eformulae.com
4. Math2.org
Instat message & chat all ur
just go & download
all in one chat client software
www.pidgin.im
& enjoy chating in pc.
all in one chat client software
www.pidgin.im
& enjoy chating in pc.
Check ur invesuval yahoo friend
just go
http://ydetector.com
& enter ur friends id then scan it
now its tel u about ur frns status.
http://ydetector.com
& enter ur friends id then scan it
now its tel u about ur frns status.
Free Video Chat with friends on mobile 4 free
just go to
www.imichat.com & chat with ur gtalk,yahoo,nimbuzz
& all friends.
www.imichat.com & chat with ur gtalk,yahoo,nimbuzz
& all friends.
Repair The Damage Done By Trojan / Bagle Worm With Bagle Restore
What is a Bagle Worm ?
The Bagle worm arrives via email with a Subject line of "Hi" and a body that reads like
Test =)
Test, yep
The email carries a randomly named attachment with a .EXE extension. If the attachment is opened, it will infect the recipients system, launch the innocuous calc.exe (Calculator) program, and modify the registry to remain active upon reboot. Bagle peruses .wab, .txt, .htm, and .html files found on the infected system to harvest email addresses in order to send itself to future victims.
Damage Done Bye Bagle Worm.com
Bagle drops the file bbeagle.exe to the Windows\System directory and modifies the System Registry as follows:
HKEY_CURRENT_USER\Software\Microsoft\Windows\CurrentVersion\Run "d3dupdate.exe" = C:\WINNT\System32\bbeagle.exe
and
HKEY_CURRENT_USER\Software\Windows98 "frun"
HKEY_CURRENT_USER\Software\Windows98 "uid"
Lets see how can we fix the damages done by Bagle worm your computer
Fix:
In order to fix the damages done by Bagle Trojan you use Bagle Restore which is a free tool to fix all the infections caused by Bagle Worm. Bagle Restore lets you restore with one click all the damage done by Bagle and remained after its removal.
The tool is in Italian language, but you can simply use this tool just by clicking the single button on the small application interface to remove all the infections caused by Bagle Worm.

Black Screen Fix – Windows 7 Black Screen Of Death Error Fixing Tool

A new kind of problem has been observed with some of the Windows 7 PC called the Black Screen of Death. This black screen of death is not like the Blue Screen Of Death (BSOD) as experienced with earlier version of Windows.
Symptoms of Black Screen of Death:
After logging on there is no desktop, task bar, system tray or side bar. Instead you are left with a totally black screen and a single My Computer Explorer window. Even this window might be minimized making it hard to see.
This is a relatively new kind of problem and Microsoft is Investigating into this Windows 7 Problem of Black Screen [Source - TechFlash].
windows-7-logo
In this article we will share with you the tool to fix this problem with help of a free tool.
Fix:
When there is black unresponsive screen on Windows 7 and you can not see any icon or any active Window, please follow the steps below :
1. Restart the Computer and login with the login and password that you use.
2. If the black screen appears and there is no icon visible on screen, Press the “ALT + CTRL + DEL” keys on the keyboard together.
3. A windows will appear with option to launch Task Manager, Simply Launch Task Manager.
4. On Task Manager, go to Application Tab and Click on New Task
5. Now type the following in the task window:
"C:\Program Files\Internet Explorer\iexplore.exe" "http://info.prevx.com/download.asp?GRAB=BLACKSCREENFIX"
and press enter.
Note: If you have installed Windows 7 in some other disk like D: or E: etc, please replace the c: with the drive letter because the above command assumes the default path ofWindows 7 Installation.
6. When you press enter, you will see a download window, on that window, select the option “Run”, doing this will download the tool, run it and fix the issue.
Idian goverment block all fraud IMEI number mobile from 1 dec.
check ur mobile no is GOOD OR NOT
go to
http://is.gd/5340X
go & check it no
want to creat DVD for ur any video file?
just go to
www.sothinkmedia.com
& download sothink movie
dvd maker.
its a freeware software for a
increase ur PC speed
also its life
-dont use C drive much(less dan 50%)
-dont keep much icons on desktop
-shutdown properly.
-dont use C drive much(less dan 50%)
-dont keep much icons on desktop
-shutdown properly.
do you want to Create your own icon?
do you want to Create your own icon?
go to
>Paint
>open image
>resize it to 32x32 as size&pixels.
save as "filename.ico" & use it as icon.
#
Image (Picture) commands:
5 -Zoom in
0 -Zoom out
2,8,4,6 -Move pictures (when Zoom level is high).
go to
>Paint
>open image
>resize it to 32x32 as size&pixels.
save as "filename.ico" & use it as icon.
#
Image (Picture) commands:
5 -Zoom in
0 -Zoom out
2,8,4,6 -Move pictures (when Zoom level is high).
Listen Fm in phone without head Phones
Start Motorolo FM without headphone-
only dial *#**372# or *#**376#
100% tested
only dial *#**372# or *#**376#
100% tested
Compression & Backup Softwares
WinZip
* Save disk space and send e-mail attachments faster
* Password-protect confidential files and e-mail attachments
* Compress JPEGs by 20 to 25% without compromising quality spacer
* Browse digital photos and other image
* thumbnails before you unzip
WinRar
WinRAR is a powerful archive manager.
It can backup your data and reduce the size of email attachments, decompress RAR, ZIP and other files.
7-Zip
Supported formats:
Packing / unpacking: 7z, ZIP, GZIP, BZIP2 and TAR
Unpacking only: ARJ, CAB, CHM, CPIO, DEB, DMG, HFS, ISO, LZH, LZMA, MSI, NSIS, RAR, RPM, UDF, WIM, XAR and Z.
IZArc
Supported formats: 7-ZIP, A, ACE, ARC, ARJ, B64, BZ2, BH, CAB, BZA, CPIO, ENC, DEB, GCA, GZ, GZA, HA, JAR, LHA, LIB, LZH, MBF, MIM, PAK, PK3, RAR, RPM, TAR, TAZ, TBZ, TGZ, TZ, UUE, XXE, YZ1, Z, ZIP, ZOO.
SyncBack
SyncBack is a flexible, and quite powerful backup and synchronization program that allows to to maintain backup copies of your files and folder, or to synchronize them, so that both locations always have a complete copy (e.g Laptop/PC).
SyncBack has established itself as world-class in the field of backup and synchronization software. Whether you're a beginner or advanced user, at home or work, SyncBack ensures your most valuable asset, data, remains protected.
Universal Extractor
Universal Extractor is a program do to exactly what it says: extract files from any type of archive, whether it's a simple zip file, an installation program, or even a Windows Installer (.msi) package
Educational Freeware
High-quality free learning software and websites from
the Internet - mostly for kids, but also for grown-ups.
A large selection of web-based software (check the Online tab), as well as Windows
software to download (to Download click on about title link).
the Internet - mostly for kids, but also for grown-ups.
A large selection of web-based software (check the Online tab), as well as Windows
software to download (to Download click on about title link).
Free Screen Recording Software

CamStudio is able to record all screen and audio activity on your computer and create industry-standard AVI video files and using its built-in SWF Producer can turn those AVIs into lean, mean, bandwidth-friendly Streaming Flash videos (SWFs)
Here are just a few ways you can use this software:
* You can use it to create demonstration videos for any software program
* Or how about creating a set of videos answering your most frequently asked questions?
* You can create video tutorials for school or college class
* You can use it to record a recurring problem with your computer so you can show technical support people
* You can use it to create video-based information products you can sell
* You can even use it to record new tricks and techniques you discover on your favourite software program, before you forget them
Schdule Birthday or Any wishes in advance
set ur friends & relatives birthday's
reminder and send mail in shedule.
just go
http://birthdayalarm.com
& send lovely gretings
Forgot Your Password Trick To open without password in your pc
New trick for change pc
user account pass.
Hack Password Of Any
Protected PC
GoTo
>Run
>Type: nusrmgr.cpl
pass window will open
user account pass.
Hack Password Of Any
Protected PC
GoTo
>Run
>Type: nusrmgr.cpl
pass window will open
Download Any Flash Stream Videos
Used To See Online Videos?
Den Install Keepvid Toolbar.
It'll Give Direct Download Dis Video Option Above The Flash Player.
-Enjoy With us.
Den Install Keepvid Toolbar.
It'll Give Direct Download Dis Video Option Above The Flash Player.
-Enjoy With us.
Clean Viruses From Your USB Drives – Delete Virus Created Files And Other Specific Files From Pen Drives With USBDrive Fresher
It could happen that you suddenly see some useless files created on your USB portable
devices like pen drives, iPod and Memory Card etc. These files may be sometimes
created by some virus infection which might have come after you had used your USB
drive on any other computer which is already infected with some virus.

When you drive get infected normally the virus will create some virus executables
and autorun.inf files which will make the executable run the next time you connect
that drive to any other computer, so in order to remove virus from pen drive you
will need to remove autorun.inf and other virus files
See Also: Free USB Flash Drive Protector
Here is how you can remove these files and make your drive free from virus
Fix:
USBDriveFresher [ via BlogsDNA ] is a free to use tool to clean up your USB drives
from unwanted and useless files. It will remove the files like thumbs.db, or
.Trashes folder etc and moreover you can also configure what to delete and what not
to delete on your USB portable drive.

it can perform following type of clean ups
1. Customizable cleanup of files and folder which you specify
2. Predefined cleanup settings you had specified
3. Clean USB drive with a single mouse click
4. Auto cleanup of USB drive when it is plugged in to your computer
5. Folder deletion on USB Drive
Fix Windows Restrictions and Errors With XPQuickFix [ Virus Removal Tools ]
XPQuickFix is a portable freeware utility which lets you fix windows errors and remove
restrictions caused due to virus and worms infection. It can correct 25 common Windows
XP problems such as enable the Task Manager, enable Registry Editor, fix a CD
autoplay, enable folder options

It lets you restore the following set restrictions
* Enable Task Manager
* Enable Registry Editor
* Stop My Documents open at startup
* Enable Folder Options
* Restore missing Run dialog box
* Enable Command Prompt
* Restore My Computer (Computer) properties
* Restore Device Manager
* Fix delay in opening Explorer
* Restore grayed Explorer and Taskbar toolbars
* Restore My Documents properties
* Remove OEM splash and wallpaper
* Restore My Network Places to Desktop
* Enable Recovery Console
* Restore grayed file associations
* Fix right-click error
* Fix slow network file/shared/remote
* Restore Network icon to system tray
* Fix slow hotkeys
* Fix CD/DVD drive is missing or not recognized
* Fix CD autoplay
* Restore “Send To” context menu item
* Restore the native ZIP file integration
* Fix error 1606 couldn’t access network location
* Error when trying to access Add or Remove/ Program and Features program
How to Disable the Windows Media Player for Windows XP Automatic Update Feature
To control whether you allow the Windows Media Player Automatic Update feature, user
the following Windows XP registry hack:
Hive: HKEY_LOCAL_MACHINE
Key: SOFTWARE\Policies\Microsoft\WindowsMediaPlayer
Name: DisableAutoUpdate
Type: REG_DWORD
Value: 1
The same registry hack works for Windows Media Player 7.0 and 7.1 used in NT and
Windows 2000.
For older Windows with Windows Media Player 6.4, the key is
HKEY_LOCAL_MACHINE\SOFTWARE\Microsoft\MediaPlayer\EnableAutoUpgrade, Type=REG_SZ,
and value="No".
Play DVDs with Windows Media Player
To play DVD's with Windows Media Player, you need to have a DVD Player (For
example, PowerDVD) or a MPEG2
codec installed.[HKEY_CURRENT_USER\Software\Microsoft\MediaPlayer\Player
\Settings]Create the String value Enable DVDUI, value = yes. Reboot.
Delete Windows Media Player 8 history and playlists History
In C:\Documents and Settings\{username}\Local Settings\Application Data, you
will find a file with a name such as DCBC2A71-70D8-4DAN-#HR*-#0D61DEA3FDF.ini.
Delete it.
Playlists
In C:\Documents and Settings\All Users\Applications Data\Microsoft\Media Index,
you will find a file with a DB extension. Delete it. As far as I can tell, WMP8 does
not store filenames in the registry. If you know otherwise, please let me know.
Scan and Decode Malicious Links Before Clicking
Short URL services which are spreading these days actually started becoming a free tool for these spammers to hide the potential harmful link by converting into a short URL. However there are various methods which can used to check before whetherthese links are potentially safe to click, lets discuss them one by one.
Scan Suspicious Links With AVG Link Scanner

AVG Link Scanner is free utility from same company which distribute popular free antivirus AVG Antivirus FREE Edition. This program lets you scan any link and will tell you whether that link is safe to be clicked.
Scan Suspicious Links With AVG Link Scanner

AVG Link Scanner is free utility from same company which distribute popular free antivirus AVG Antivirus FREE Edition. This program lets you scan any link and will tell you whether that link is safe to be clicked.
How To Know A Website Is Safe To Browse or Safe To Open On My Computer
These days with the there are large number of website emerging out which may harm your computer just if you open them in your browser. These websites may contain following type of infections
* viruses
* drive by downloads
* malicious pop up downloads
* worms
* Suspicious Applications
* Suspicious Browser Changes
* Security Risks
* Adware
* Trojans
* Phishing attacks
* Spyware
* Backdoors
* Remote Access softwares
* Information stealers
* Dialers
* Downloader’s
Let’s see how can you know about whether a website is safe to open on your computer
Fix:
Norton Safe Web is one such free web service which lets you check whether a web site is safe to open and browse in the browser of your computer.

This is a FREE web service by Norton which allows you check the status any website on internet, they will also rate the website on the basis of the community reviews by other people.
Checking the status of any website is quite simple as you just need to enter the URL of the website you want to test in the following format.
For Example www.commob.blogspot.com
How to backup your important data when your pen drive is infected with a virus
a. Insert your pen drive into the usb port, if it detects your drive you will see it
in my computer.
b. Now don’t double click on your drive, rather open the pen drive contents by typing
the drive letter.
For Example: type g: and press enter if your pen drive is shown as new g drive under
my computer.
c. Copy your important files from your pen drive close the window and format your pen
drive after then.
How to protect your computer from virus in pen drives
Most of the active viruses infect your windows system as soon as you double click on
the Pen Drive icon in your my computer. As virus always creates a autorun.inf file
which is a system ,hidden and a read only file on your pen drive. It point to the
main virus file which is also located on the pen drive. When user double clicks on
the pen drive files pointed by the autorun.inf got executed which copies the virus
files on your system.
The image below shows the Autorun file entries in some special characters when you
right click on the drive.
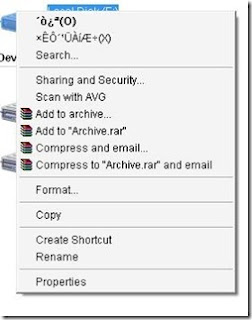
Let’s see how can you protect yourself by following certain practices.
Fix:
Let’s discuss these practices one by one:
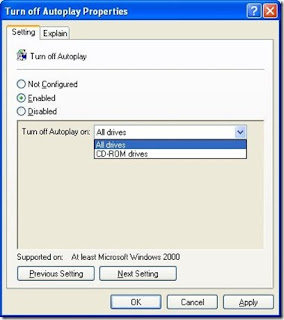
1. Disable Autorun on Your Pen Drive:
* Open to Start >> Run and type “gpedit.msc” (without quotes) and press enter.
This will open Group policy editor.
* Browse to Administrative templates >> System >> double click on Turn off
Autoplay click on Enabled and Under Settings >> Select All Drives in the drop down
and click OK (as shown in the image below)
2. Scan Your Pen Drive:
Whenever you insert your pen drive / portable drive into USB port on your system make sure to run a virus scan with your anti virus before opening your pen drive contents in windows explorer.
3. Use FreeCommander:
FreeCommander is again a file explorer like windows explorer, so you just need to
download it by clicking here and install it.
After installing open your pen drive through FreeCommander (as shown in the image
below)
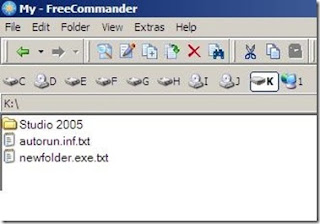
Check if there are some additional files like autorun.inf , Funny UST Scandal.avi.exe ,Ravmon.exe ,New Folder.exe etc or any other file which you have not copied or created, delete all these suspicious files on your pen drive.
4. Use your virus infected pen drive: You can also use your virus infected pen
drives to copy your important data in worst circumstances.
the Pen Drive icon in your my computer. As virus always creates a autorun.inf file
which is a system ,hidden and a read only file on your pen drive. It point to the
main virus file which is also located on the pen drive. When user double clicks on
the pen drive files pointed by the autorun.inf got executed which copies the virus
files on your system.
The image below shows the Autorun file entries in some special characters when you
right click on the drive.

Let’s see how can you protect yourself by following certain practices.
Fix:
Let’s discuss these practices one by one:
1. Disable Autorun on Your Pen Drive:
* Open to Start >> Run and type “gpedit.msc” (without quotes) and press enter.
This will open Group policy editor.
* Browse to Administrative templates >> System >> double click on Turn off
Autoplay click on Enabled and Under Settings >> Select All Drives in the drop down
and click OK (as shown in the image below)

2. Scan Your Pen Drive:
Whenever you insert your pen drive / portable drive into USB port on your system make sure to run a virus scan with your anti virus before opening your pen drive contents in windows explorer.
3. Use FreeCommander:
FreeCommander is again a file explorer like windows explorer, so you just need to
download it by clicking here and install it.
After installing open your pen drive through FreeCommander (as shown in the image
below)

Check if there are some additional files like autorun.inf , Funny UST Scandal.avi.exe ,Ravmon.exe ,New Folder.exe etc or any other file which you have not copied or created, delete all these suspicious files on your pen drive.
4. Use your virus infected pen drive: You can also use your virus infected pen
drives to copy your important data in worst circumstances.
SmS Sites For Sending Free SmS's, MOBILE CHAT SiTES
smsdiscount.com
4usms.net
smscity.com
apnasms.com
smsloop.com
MOBILE CHAT SiTES
Gumchat.net
Wapcraft.net
Tadkalive.com
LG Mobile Secret Codes
Test Mode
2945#*#
IMEI(all)
*#06#
IMEI & S/W
*#07#
software version
*8375#
Recount cheksum
*6861#
China Mobile Secret Code
diefault user code 1122,3344,1234,5676
Engineer mode
*#110*01#
Restore factory settings
*#987*99#
LCD
*#369#
Windows 7 Price In India
Windows 7 launched in India
Price details:
Home Basic - Rs. 5,899
Home Premium - Rs. 6,799
Professional - Rs. 11,199
Ultimate - Rs. 11,799.
Trick To View Files With Extension.
Just Go To Tools
=> Folder Option
=> Select View
=> And Uncheck Hide Extension Of File
Name Option
Trick To Type In Bold-Italics In Gtalk
To Type Letters In Bold In Gtalk
letters in gtalk chat box
just type
_*your matter*_
and press enter
your typed latter is now bold
italic.
letters in gtalk chat box
just type
_*your matter*_
and press enter
your typed latter is now bold
italic.
windows vista home basic home basic
opreating syestem
master key is
Name: cd key
S/N: 8rs83438dg8a83vcshsj
insert it & enjoy.
master key is
Name: cd key
S/N: 8rs83438dg8a83vcshsj
insert it & enjoy.
Lock Ur CD ROM-
Lock Ur CD ROM-
Go to
>Run
>type"regedit
>find-allocatecdrom.
Change d value frm 1 to 0.
Done.
To unlock change it to 1.
Go to
>Run
>type"regedit
>find-allocatecdrom.
Change d value frm 1 to 0.
Done.
To unlock change it to 1.
Simple Solution For Internet Error Messges
Facing error? in any web page ,like:
'Oops this link seems to b broken'.
Here is solution,
>delete cookies
>clear the cache
of ur browser.
'Oops this link seems to b broken'.
Here is solution,
>delete cookies
>clear the cache
of ur browser.
Work Without Keyboard On Your Pc ?
Ur Keyboard Not Works Properly?
But U Have To Do Some Important Work!
Dont Worry..
Just Go2 Run & Type OSK.
By Dis U Can Type Using Ur Mouse.
But U Have To Do Some Important Work!
Dont Worry..
Just Go2 Run & Type OSK.
By Dis U Can Type Using Ur Mouse.
AirTel Free INTERNET on PC:
Make A New Connection In Your Mobile (In Connections)
IP;10.1.200.99
Port;8080
APN;airtelfun.com
HP;liveairtel.in
DialupNo.;*99#
ConectionSecurity;OF
IP;10.1.200.99
Port;8080
APN;airtelfun.com
HP;liveairtel.in
DialupNo.;*99#
ConectionSecurity;OF
Free MissCALL ALERT:
BSNL
*62* 9117010#
AIRTEL
*62* 91565#
AIRCEL
*62*984220100#
IDEA
*62*919847926340#
RIM
*62*919016000700#
*62* 9117010#
AIRTEL
*62* 91565#
AIRCEL
*62*984220100#
IDEA
*62*919847926340#
RIM
*62*919016000700#
Secretly Hide Any File Inside JPG Image File
Here’s the full trick:
Step 1: You will need two files – the file you want to hide and one jpg image – it
can be of any size or dimensions. [If you want to hide multiple files in one jpeg
image, just zip them into one file]
Step 2: Copy the above two files to the C: folder and open the command prompt
window.
Step 3: Move to the c: root by typing cd \ [if the files are in another folder,
you'll have to change the prompt to that folder]
Step 4: The most important step – type the following command:
copy /b myimage.jpg + filetohide.pdf my_new_image.jpg
To recover the original PDF file, just rename my_new_image.jpg to filename.pdf.
Here we illustrated with an pdf file as that works with simple renaming. If you
want to apply this technique to other file formats like XLS, DOC, PPT, AVI, WMV,
WAV, SWF, etc, you may have to first compress them in RAR format before executing
the copy /b DOS command.
To restore the original file, rename the .jpg file to .rar and extract it using
7-zip or Winrar.
Tip For Your Own Logo In My Computer’s Properties Menu
1. Create a new Text Document (notepad)
2. Type this:
[general]
Manufacturer=Dell
Model=XPS200s
[Support Information]
Line1=Tweak by TURTELL
Line2=ehehe
Line3=up to any lines
3. Save this Text Document as OEMINFO.INI
4. Copy the OEMINFO.INI to “c:\windows\system”
5. Now create your own LOGO
(Note this image cannot be larger than 180 pixels wide and 114 pixels high must be
a bitmap image)
6. Save this as OEMLOGO.BMP
7. Copy the OEMLOGO.BMP to “c:\windows\system”
You can change the “DELL” and “XPS200s” as my given sample to what you want
Now check the PROPERTIES of your “My Computer”
Remove Orkut Banned,FireFox,YouTube Banned Virus
How to Remove it:
1. Open Taskmanager -> Processes tab
Find svchost.exe with username(warning not a svchost.exe) end or kill these
processes by pressing endprocess.
2. Open My Computer then type:
“C:\heap41a” in the address bar with quotes.
3. Delete everything in the folder
4. Goto Start -> Regedit -> Edit Tab -> Find -> Search for “heap41a” and delete
that key.
Like:
C:\heap41a\svchost.exe
C:\heap(some number)\std.txt
5. Close the Registry Editor
That’s it !
How to lock folders without any software?
Though there are various softwares to lock up folders on your windows, but what if we can just do same thing without help of any software. Today here I am writing how to lock up a folder in windows without help of any software. Hope you all will enjoy this trick.
Just follow some intructions :
Type the following code in a note pad and save the note pad in your pc with the name ‘ NOMANs Lock Up.bat ‘ (that is with the extension of .bat). You can replace the ‘NOMAN’s Lock Up ‘ portion with anything u want to use.
A batch file will be created where you have saved. Now double click on it, it will make a folder with the name ‘ Locker ‘ at the same place where the batch file is save.
Now add the files you want to lock in that folder named “Locker”.
Double click on the batch file. It will ask for locking the folder. Type ‘ Y ‘ OR ‘ y ‘ to lock the items. The folder will be locked and hidden.
[NB: This is a very strong process. Even if you choose Tools – Folder Options… – View – Show hidden files and folders, the ‘ Locker ‘ folder will remain hidden. Only a correct password can unlock it.
To unlock the items, just double click on the batch file again and enter the password unlock in the new opened window. Then hit ‘ Enter ‘ ( iff u wanna create othr passwrd. thn u have to make change in the code….( I mark * there for you)
cls
@ECHO OFF
title Folder Locker
if EXIST “Control Panel.{21EC2020-3AEA-1069-A2DD-08002B303
09D}” goto UNLOCK
if NOT EXIST Locker goto MDLOCKER
:CONFIRM
echo This is created by SAKET,Hey Dude,Are you sure u want to Lock the folder(Y/N)
set/p “cho=>”
if %cho%==Y goto LOCK
if %cho%==y goto LOCK
if %cho%==n goto END
if %cho%==N goto END
echo Invalid choice.
goto CONFIRM
:LOCK
ren Locker “Control Panel.{21EC2020-3AEA-1069-A2DD-08002B30309D}”
attrib +h +s “Control Panel.{21EC2020-3AEA-1069-A2DD-08002B30309D}”
echo Folder locked
goto End
:UNLOCK
echo Enter password to Unlock folder
set/p “pass=>”
if NOT %pass%==unlock goto FAIL
attrib -h -s “Control Panel.{21EC2020-3AEA-1069-A2DD-08002B30309D}”
ren “Control Panel.{21EC2020-3AEA-1069-A2DD-08002B30309D}” Locker
echo Folder Unlocked successfully
goto End
:FAIL
echo Invalid password
goto end
:MDLOCKER
md Locker
echo NOMAN created successfully
goto End
:End
Hack or trick to use free airtel gprs from your mobile or pc for free.
Requirements:
You require a PC or a Laptop and Serial/USB cable OR Infrared Device OR Bluetooth dongle in order to first connect your phone with your computer.
Step By Step Procedure:
1)First Activate Airtel Live!( It is FREE).
2) Create TWO Airtel gprs data accounts in your mobile and set the
FIRST one as the active profile.
3)Connect your phone with your connectivity cable using blutooth dongle or usb/serial cable.
4) Go to control panel and create a new dial up connection.
Connection Device : Your mobile’s modem
ISP Name : Anything you want to enter.
Phone Number : Your mobile number.
Username: blank
Password: blank
5) Now setup your browser at your pc to use the proxy
100.1.200.99 and port 8080.
6) Connect to the dial-up account.
7) Try on your mobile and access any site. You will get “Access
Denied…”. Keep the mobile down.
8 ) On the PC ( or Laptop) open your browser, enter any address ,
press ENTER and WAIT for some minutes.
9) That’s it done ! now you can open any page on your pc for free.
I hope these settings may work please let me know if you have any problem by leaving a comment here, still if you are not able to use free airtel gprs with this gprs tricks, check the latest trick to use free airtel gprs.
You can also use the search box provided in the top header of this site to search more gprs hacks and tricks of airtel and other network.
Free gprs settings for idea, hutch, airtel, bsnl, airtel live, airtel mobile configure manually.
Manual Hutch Gprs Settings
1. Account Name – Hutch_GPRS
2. User Name – Blank
3. Password – Blank
4. Proxy – Enabled/yes
5. Access Point Name – portalnmms
6. Full Internet Access Point Name – www
7. Proxy and Server address – 10.10.1.100
8. Proxy and Server Port – 8080
9. Homepage – http://hutchworld.co.in
10. Authentication Type – Normal
Manual Airtel Gprs Settings
1. Homepage – any page you want to set.
2. User Name – Blank
3. Password – Blank
4. Proxy – Enabled/yes.
5. Proxy and Server Adress – 202.56.231.117
6. Proxy and Server Port – 8080
7. Data bearer – GPRS or Packet Data.
8. Access Point Name – airtelgprs.com
9. Authentication Type – Normal
10. Use preferred access point – No
Manual Airtel live settings
1. Account Name – Airtel_live
2. Homepage – http://live.airtelworld.com
3. Username – Blank
4. Password – Blank
5. Proxy – Enabled/yes
6. Proxy and Server Adress – 100.1.200.99
7. Accespoint Name – airtelfun.com
8. Proxy and Server Port – 8080
9. Data bearer – GPRS/ Packet Data
10. Authentication Type – Normal
Manual Idea Gprs Settings
1. Account Name – idea_GPRS
2. Username – Blank
3. Password – Blank
4. Homepage – http://wap.ideafresh.com
5. Proxy and Server Port – 8080
6. Proxy and Server adress – 10.4.42.45
7. Databearer – GPRS / Packetdata
8. Acces Point Name – imis
9. Proxy – Enabled/yes
10. Authentication Type – Normal
Manual Bsnl Gprs Settings
1. Account Name – BPL WAP
2. Username –
3. Password –
4. Proxy – Enabled/yes
5. Homepage – http://wap.mizone.bplmobile.com
6. Proxy and Server address – 10.0.0.10
7. Proxy and Server Port – 8080
8. Acces Point Name – mizone
9. Data bearer – GPRS/ Packetdata
10. Authentication Type – Normal
Schedule switch off on your symbian phone with switch off
Switch off is an application which will prove quite useful for people having fixed schedules specially the students and working class of people. It happens on regular basis that you switch off your phone daily at the same time of even at fixed times in a day. But if you have switch off installed on your phone you don’t have to worry about switching it off, it will automatically get switched off at the preset time determined by you.
The basic functionality of switch off:
1. The time at which you want to switch off your cell phone just enter the time and enable the auto shut down option.
2. After you have enabled the option, just let the application work in the background and as soon as the preset time is reached the phone gets auto shutdown.
3. Switch off as the name indicates only has the feature to switch off the mobile phone but there is no way you can switch on your phone at pre determined time. This particular thing makes switch off just another ordinaryapplication.
4. With no support for auto switch on of your phone, there is every possibility of you forgetting to switch on your phone after it has switched off automatically. And that is a situation which no one would like ever. There is nothing worse than missing your important calls may it be personal or business calls.
Send sms to any number via your pc with nokia pc suite
Follow the steps to send the sms via your phone with the help of nokia pc suite
1. Install the Nokia PC suite from the cd which you got with your nokia phone at the time of purchase.
2. After getting connected with nokia pc suite via Bluetooth or through usb cable.
3. Open Nokia phone browser in My Computer.
4. Click on the which has a tooltip as create a new text message in the
vertical sidebar
5. Nokia Text Message Editor will open up in which you can enter the number and type your message
6. After typing click on File>>Send to send the message.
How to Get Your Twitter Account Verified
Twitter started verifying user accounts back in June to reduce cases of celebrity impersonation and mistaken identities . If you are a Twitter user and want to get your account verified, there is this User Verification form you can fill, but the chances that you will get a Verified Account badge are very low unless you are a famous personality or work at Twitter.
Anyways, it is worth a try, you might just get lucky. To improve your chances, you can add a Twitter badge linking to your Twitter profile on your website.
How to Verify your Twitter Account
To get your Twitter account Verified, just log in to your Twitter account, fill the Account Verification Request form and submit it.
While you are at it, also follow me on Twitter. :D
Private Torrent Trackers:
A private tracker is a tracker which allows only registered users to download torrents. The registered users are required to maintain a certain upload-to-download ratio and are banned if the ratio is too low. This ensures that the users don’t just leech the files but also seed them after downloading it completely, which in turn ensures that you get very fast download speeds.
1. Demonoid.com
2. BitMe.org
3. TorrentLeech.org
4. BitHQ.org
5. HDBits.org
6. BitMeTV.org
7. TVTorrents.com
8. BWTorrents.com
9. DCTorrent.com
10. DesiTorrents.com
11. Torrent-Damage.net
12. BitSoup.org
13. Cheggit.net
If you need an invite to any of these private trackers, just leave a comment below with a valid email address. If I have any spare invites, I will forward them to you. :)
You can also try BTRACS.com to monitor when these trackers open up for new registrations.
Free Airtel Live – ALIVE
To use Airtel Live for free and access all sites and download stuff using it, you just need to use the TeaShark browser. Download TeaShark here – http://teashark.com/download.html . Just install it, and surf using it, you will be able to surf all sites and download files with no restrictions.
Free Net on Phone – NOP
Most of the Free Tricks for Airtel GPRS have been blocked by Airtel, with the very popular Free Mobile Office low balance trick being blocked just yesterday. There are only a few working tricks now to bypass Airtel’s restrictions and use GPRS – MO / NOP / Airtel Live for free.
While Airtel has closed new registrations for NOP, the old users can still use it at the earlier rates – Rs. 2/day. It does have a download limit of 3 MB per file though, but you can bypass it easily using this method.
Download more than 3 MB using NOP:
You just need to use the Java version of UCWEB browser in your mobile to be able to download more than 3 MB. You can Download UCWEB here – http://wap.ucweb.com/dl_platform/publish/scripts/webcommon.php or go to http://www.ucweb.com/English/download.shtml and select the Generic Version.
how to do just about everything? do u know?
just go to
www.ehow.com
here u can know how its works
& much more for great knowledge.
enjoy.
www.ehow.com
here u can know how its works
& much more for great knowledge.
enjoy.
want 2 upload files on the net use dis sites , www.listentoamovie.com
want 2 upload files on the net use dis sites
www.rapidshare.Com
www.megaupload.Com
dont need to sign up.
www.listentoamovie.com
The audio track from your favorite movies
and television, good for putting on an
Ipod or listening to in the car.
www.rapidshare.Com
www.megaupload.Com
dont need to sign up.
www.listentoamovie.com
The audio track from your favorite movies
and television, good for putting on an
Ipod or listening to in the car.
Fake orkut login page like
Fake orkut login page like
www.orkut.c-o.in which look like orkut can steal your password
www.orkut.c-o.in which look like orkut can steal your password
Lock Ur CD ROM-
Lock Ur CD ROM-
Go to
>Run
>type"regedit
>find-allocatecdrom.
Change d value frm 1 to 0.
Done.
To unlock change it to 1.
Go to
>Run
>type"regedit
>find-allocatecdrom.
Change d value frm 1 to 0.
Done.
To unlock change it to 1.
Wanna Search for your Favorite Movies,Music,Books,Softz in Rapidshare.com?
Wanna Search for your Favorite Movies,Music,Books,Softz in Rapidshare.com?
Just goto
www.rapidlibrary.com
and Search files in RapidShare...
Just goto
www.rapidlibrary.com
and Search files in RapidShare...
Download U Tube Videos Without Copy Paste Its Link:
Download U Tube Videos Without Copy Paste Its Link:
Go
Keepvid.com & Install Its Toolbar
By Dis On Each Video "Download Video" Link Will Appear
want to download movies in smart movie format (cell format)
http://moviesmobile.net
u know IDM (download manager) is the best download
software in world.
its bost any download
speed 300% more.
its great perform in dail up.
Did U Know?
Nokia Mini Speake MD9 Is A Compact Loud Speaker Comprises AAA Batteries & Delivers Extreme High Quality Sound Where Ever U Want!
Simple File sharing in a network
How can we disable or enable Simple File Sharing in Windows XP?
Simple File Sharing permits controlling both sharing and NTFS permissions at the folder level. Network access is through a guest account. Windows XP Home Edition always has Simple File Sharing enabled. By default, it is turned off in Windows Professional when it joins a workgroup. Classic file sharing is used when Windows XP Pro joins a domain. Windows XP Home cannot join a domain. Simple File Sharing can be disabled in Windows XP Pro when it is a member of a workgroup. When it is disabled security can be controlled for individual user accounts.
To disable Simple File Sharing, click start, double-click My Computer, Tools, Folder Options, View tab, at the bottom of the list uncheck Use simple file sharing (Recommended).
computer network Cabling
Straight,Crossover cable and Rollover Cable
Common Ethernet network cables are straight, crossover cable and roll over. This Ethernet network cable is made of four pair high performance cable that consists twisted pair conductors that used for data transmission. Both end of cable is called RJ45 connector. The colour of wires are orangewhite,orange,greenwhite,green,bluewhite,blue,brownwhite,brown.
The cable can be categorized as Cat 5, Cat 5e, Cat 6 UTP cable. Cat 5 UTP cable can support 10/100 Mbps Ethernet network, whereas Cat 5e and Cat 6 UTP cable can support Ethernet network running at 10/100/1000 Mbps. Cat 3 UTP cables are not popular anymore since it can only support 10 Mbps Ethernet network.
Straight,crossover cable and roll over can be Cat3, Cat 5, Cat 5e or Cat 6 UTP cable, the only difference is each type will have different wire arrangement in the cable for serving different purposes.
Straight Cable
You usually use straight cable to connect different type of devices. This type of cable will be used most of the time and can be used to:
1) Connect a computer to a switch/hub's normal port.
2) Connect a computer to a cable/DSL modem's LAN port.
3) Connect a router's WAN port to a cable/DSL modem's LAN port.
4) Connect a router's LAN port to a switch/hub's uplink port. (normally used for expanding network).
5) Connect 2 switches/hubs with one of the switch/hub using an uplink port and the other one using normal port.
If you need to check how straight cable looks like, it's easy. Both side (side A and side B) of cable have wire arrangement with same color.
Crossover Cable
Sometimes you will use crossover cable, it's usually used to connect same type of devices. A crossover cable can be used to:
1) Connect 2 computers directly.
2) Connect a router's LAN port to a switch/hub's normal port. (normally used for expanding network).
3) Connect 2 switches/hubs by using normal port in both switches/hubs.
In you need to check how crossover cable looks like, both side (side A and side B) of cable have wire arrangement with following different color .
Roll Over Cable
This roll over cabling is just opposite to Straight Cabling
Side A Side B
Orange White Brown
Orange Brown White
Green White Green
Blue Blue White
Blue White Blue
Green Green White
Brown White Orange
Brown Orange White
Bios Flashing
Flashing the BIOS is one of the most feared topics related to computers. Yes, people should be very cautious because it can be dangerous. This article is going to focus on the basics and explain ways to flash the BIOS, precautions and how to recover in case of a bad flash.
The Basics
First of all, let's get into the basics. What is the BIOS and why should you flash it? Let me explain. It's the acronym for Basic Input/Output System. It's one of the most crucial components on a motherboard. It determines and tells your computer what it can do without accessing any other files or programs from your storage; it acts like simple software. Basically the BIOS contains all the information that's needed for your computer to POST (=Power on Self Test). This includes how to control your keyboard, communicate with your processor, send/receive video signals to/from your monitor, and recognize your components (hard drives , optical drives, USB devices, serial ports and so on). If this makes sense then you understand that without the BIOS a computer would not boot at all (no POST); neither will it boot with a defective/corrupted BIOS.
Why should we flash the BIOS?
It's simple. When manufacturers release a new motherboard, of course, the BIOS on the board is already flashed. Since technology advances in quantum leaps it's very important to realize that in a matter of weeks or months new products are going to be released. So computers should support them, right? That's the bottom line here. Flashing your BIOS to the latest release is crucial because it enhances your system's capabilities, helps it to detect newer devices and components (bigger hard drivers, newer processors, and so forth), and improves stability (very often in the latest BIOS flashes manufacturers apply a series of bug fixes). There is always a "change-log" included with every newer BIOS release that should be your number 1 must-read piece of information; it helps you decide whether or not it's worth it to flash that specific version.
BIOS Chips and Manufacturers
There are quite a few manufacturers that are producing different BIOS chips: Award, AMI, Phoenix, and IBM. Most commonly you can find AMIs, AWARDs and PHOENIXes. The BIOS is stored on a ROM chip.
These ROM BIOS chips can be of different measurements and look different from each other. Check out the following two types of chips. The one on the left is an AWARD (as stated on the sticker), while the one on the right is a Phoenix chip.
You may find other chips that can't be "taken out" with extractors; on older systems quite often the BIOS chip was soldered directly on the board.
Every manufacturer recommends that you use their BIOS flashing utility. Also, don't forget to read the information that's included and related to flashing in your motherboard's manual. Yes, dig that manual out (or if you can't find it then download it from the manufacturer's website; it's usually available) and read it!
Four of the most common flashers are: AWDFLASH, AMIFLASH, UNIFLASH and AFUDOS (only for ASUS boards). Out of these the UNIFLASH (get it here) is the universal flasher that can usually flash every BIOS; it has awesome compatibility capabilities. Keep in mind that BIOS flashing can be (and is) dangerous, because in the case of a bad flash the data ends up corrupted and your computer won't POST anymore. So I'm recommending wholeheartedly that you use the BIOS flasher that's explained in the manual and provided by the manufacturer of your board. Read the manual, do your research and when you're ready, then and only then proceed to follow the instructions.
After you get your flasher you need the latest BIOS flash file. First find out your motherboard manufacturer's name and your board's exact name and specifications. Visit your manufacturer's website and download the latest non-beta version (betas can be risky and I don't suggest you experiment if you can't fix it if a bad flash happens; we'll discuss that a bit later). These files usually have ".ROM" or ".BIN" extensions. Later on I'm going to call the "latest BIOS file" "newbios.bin."
I'm going to give you examples of how to use UNIFLASH, AWDFLASH, AMIFLASH and AFUDOS. Read them strictly as examples and do not proceed to flash your latest BIOS version before you understand what each option gives and how to use these flashers.
Flashing with UNIFLASH:
A:uniflash.exe newbios.bin
Flashing with AWDFLASH:
A:awdflash.exe newbios.bin /py /sn /cc
Flashing with AMIFLASH:
A:amiflash.exe newbios.bin /A+ /-B /-C /-D /E /-G /I /L /N /R /V
Flashing with AFUDOS:
A:afudos.exe /inewbios.bin
Even though the above commands do work it's always crucial that you read what every command does and understand them. First of all, once you're booted into MS-DOS, execute the flashers without commands and options. Just use a simple "awdflash.exe" or "amiflash.exe"-- then a help screen (which explains all of the available commands and options) will appear. Read that thoroughly before proceeding and follow the instructions.
As a side note, UNIFLASH has a UI (user interface) so it definitely helps beginners. Execute the "uniflash.exe" and the UI will appear and guide you through.
I can't stress enough that flashing the BIOS can be dangerous if the flashing process isn't finished successfully or if the newly flashed file doesn't match your system or is incorrect. First of all, be aware of electricity and the chances of a power outage. Never flash if there is bad weather outside; losing electricity while in the middle of flashing can have disastrous effects. It's always advisable to have a USP too. Flashing the BIOS doesn't takes longer than one minute so it's very important to be "safe" while flashing; if you must, borrow a USP from your next door neighbor, if possible.
Before proceeding to flash don't forget to go into your BIOS and write down (or take a photo if you' have a camera) all of your settings. This is crucial because the "default" settings may not be the best option for your system, especially if you've tweaked BIOS and you do not remember anymore what tweaks you've applied.
Do NOT reboot and/or shut down your system while flashing; the reason for that should be self-explanatory. It's also recommended that you set your BIOS options to "default": reboot, go into BIOS and select the option "Load Fail-safe defaults" or something similar. Now all you need to do is to make backup bootable system disk(s), which can save you in case of a bad flash. Let me explain why.
I'm going to introduce and explain a new term in my article: the "boot-block." A boot-block is a small part of the BIOS that helps in case of a bad flash. Let me explain how and why. When flashing the BIOS usually (if you don't use additional commands) the boot-block remains intact, meaning that the "original" boot-block remains safe. The boot-block only contains the data that lets it know how to boot and flash the BIOS from a floppy disk or CD.
Suppose the data on the BIOS is screwed up; no POST will happen, nothing will appear on your monitor but your FDD and optical drives are going to blink like hell. This means that you have a bad flash. Either the wrong version of BIOS was flashed onto the ROM or there was a power outage and the flashing stopped right in the middle of the process. You can save your computer by inserting a bootable MS-DOS floppy disk (or CD) that is going to have following files on it: your flasher, a new BIOS flash file and "autoexec.bat." Autoexec.bat is executed as soon as your system boots up in MS-DOS. You need to include a command to run the flashing utility. Check out the following two examples; the first one is for AMI and the second one for Award.
amiflash.exe newbios.bin /A+ /-B /-C /-D /E /-G /I /L /N /R /V
awdflash.exe newbios.bin /py /sn
The above examples work only for AMI/AWARD chips, obviously. Replace the example with the correct commands, the name of the new flash file and use the appropriate flasher. After you've put everything on the floppy, insert it and reboot.
There is another way to flash AMI BIOS without the need for a bootable floppy disk. Rename your new BIOS flash file to "AMIBOOT.ROM" then copy it to a floppy disk (that will contain only this file). Insert it into your FDD and reboot. Hold down "CTRL"+ "HOME" to launch the flashing process.
You'll notice that the floppy LED (or the light on the optical device) is going to report that it's reading. Your system will boot up in MS-DOS and then the flashing process will start. Don't expect anything to appear on your screen; you need to wait until you figure out yourself that the LED isn't blinking anymore and it completed its task; you can wait up to a few minutes maximum to be sure that the process is finished.
Eject the CD or get the floppy disk out and reboot your system. If everything goes all right it is going to POST correctly and work as usual; what a relief. You've just saved your system from a bad flash.
But what if this doesn't help? Or what if you've flashed corrupt data also on the boot-block? What can you do then? Well, there are a few ways to flash a new and correct version of BIOS onto the chip. The most popular technique is "hot-swapping." You are going to need another ROM chip that is flashed with the correct BIOS, meaning that it's taken out of a working motherboard which is exactly like yours.
You borrow that chip for a half an hour (from a friend, neighbor, etc), install it in your motherboard and boot up; your system will POST if the data on the new chip is correct. As soon as you've booted up into MS-DOS, you take out the BIOS ROM chip on-the-fly and replace it with your chip (which has corrupt data on it). Then you proceed to flash.
As a side note, please be very cautious and aware that fiddling with components without turning the PC off is very dangerous; you can do more harm than good. Then again, this technique is tried and tested; it works but it's recommended only as a last resort when everything else fails. Basically you're taking out a chip that is powered on, so there is a slight chance of screwing up the entire motherboard's circuitry along with the chip.
Boot Screen Builder For Windows Xp
BootXP is an easy to use startup logo changer designed for Windows 2000 and XP. Use
bitmap files or kernel files as sources. Show animated full screen previews of the
screens, you will see it as if you were booting. It also makes a copy of your kernel
and have a safe install/uninstall progress.
bitmap files or kernel files as sources. Show animated full screen previews of the
screens, you will see it as if you were booting. It also makes a copy of your kernel
and have a safe install/uninstall progress.
How to Recover NTLDR missing
NTLDR Is Missing
How to Troubleshoot the "NTLDR Is Missing" Error Message
When you start your Windows based computer, you may receive the following error message:
NTLDR is missing
Press any key to restart
This problem may occur if the basic input/output system (BIOS) on your computer is outdated, or if one or more of the following Windows boot files are missing or damaged:
Ntldr
Ntdetect.com
Boot.ini
To resolve this issue, verify that the BIOS on your computer is current, and then use one or more of the following methods, as appropriate to your situation, to repair the Windows startup environment.
Verify That the BIOS on the Computer Is Current
Make sure that the latest revision for BIOS is installed on the computer. Contact the computer manufacturer to inquire about how to obtain, and then install the latest BIOS update that is available for the computer.
For information about how to configure and how to verify the correct BIOS settings for the computer, see the computer documentation or contact the manufacturer of the computer. For information about how to contact your computer manufacturer, click the appropriate article number in the following list to view the article in the Microsoft Knowledge Base:
To repair the Windows startup environment, use one or more of the following methods, as appropriate to your situation.
Method 1: Use a Boot Disk to Start the Computer
1. Create a Windows boot disk that contains the following files:
Ntldr
Ntdetect.com
Boot.ini
Ntbootdd.sys
2. Modify the Boot.ini file to point to the correct hard disk controller and to the correct volume for your Windows installation. For more information about how to create a boot disk, click the following article number to view the article in the Microsoft Knowledge Base:
3. Insert the boot disk into the computer's floppy disk drive, and then restart the computer.
4. Copy the Ntldr file, the Ntdetect.com file, and the Boot.ini file from the boot disk to the system partition of the local hard disk.
Method 2: Use the Recovery Console
1. Use the Windows Setup disks to restart the computer, or use the Windows CD-ROM to restart the computer.
2. At the Welcome to Setup screen, press R to repair the Windows installation.
3. Press C to repair the Windows installation by using the Recovery Console.
4. Type the number that corresponds to the Windows installation that you want to repair, and then press ENTER. For example, type 1, and then press ENTER. For more information, click the following article number to view the article in the Microsoft Knowledge Base:
5. Type the Administrator password, and then press ENTER.
6. Type map, and then press ENTER. Note the drive letter that is assigned to the CD-ROM drive that contains the Windows CD-ROM.
7. Type the following commands, pressing ENTER after you type each one, where drive is the drive letter that you typed in step 4 of "Method 2: Use the Recovery Console," of this article:
copy drive:\i386\ntldr c:\
copy drive:\i386\ntdetect.com c:\
If you are prompted to overwrite the file, type y, and then press ENTER.
NOTE: In these commands, there is a space between the ntldr and c:\, and between ntdetect.com and c:\.
8. Type the following command, and then press ENTER:
type c:\Boot.ini
A list similar to the following list appears:
[boot loader]
timeout=30
default=multi(0)disk(0)rdisk(0)partition(1)\WINNT
[operating systems]
multi(0)disk(0)rdisk(0)partition(1)\WINNT="Microsoft Windows osname Professional" /fastdetect
If you receive the following message, the Boot.ini file may be missing or damaged:
The system cannot find the file or directory specified.
9. If the Boot.ini file is missing or damaged, create a new one. To do so, follow these steps:
1. Use a text editor, such as Notepad or Edit.com, to create a boot loader file similar to the following boot loader file:
b. [boot loader]
c. timeout=30
d. default=multi(0)disk(0)rdisk(0)partition(1)\WINNT
e.
f. [operating systems]
g. multi(0)disk(0)rdisk(0)partition(1)\WINNT="Microsoft Windows osname Professional" /fastdetect
8. Save the file to a floppy disk as Boot.ini.
NOTE: If you used Notepad to create the file, make sure that the .txt extension is not appended to the Boot.ini file name.
9. Type the following command at the Recovery Console command prompt to copy the Boot.ini file from the floppy disk to the computer:
copy a:\Boot.ini c:\
10. Type exit, and then press ENTER. The computer restarts.
Method 3: Use the Windows CD-ROM
1. Insert the Windows CD-ROM into the computer's CD-ROM drive or DVD-ROM drive, and start Windows Setup.
2. On the Welcome to Setup page, press R.
3. On the Windows Repair Options page, press R.
4. When you are prompted to select one of the repair options, press M.
5. Press the UP ARROW, press the UP ARROW again, to select Verify Windows system files, and then press ENTER to clear the selection.
6. Press the DOWN ARROW to select Continue (perform selected tasks), and then press ENTER. The following message appears:
You need an Emergency Repair disk for the Windows installation you want to repair.
7. Do one of the following, as appropriate to your situation:
* If you have an Emergency Repair Disk, follow these steps:
1. Press ENTER.
2. Insert the Emergency Repair Disk into the computer's floppy disk drive, and then press ENTER.
3. Follow the instructions to repair the installation, and then restart the computer.
-or-
* If you do not have an Emergency Repair Disk, follow these steps:
. Press L. You receive a message similar to the following:
Setup has found Windows in the following folder:
drive:\WINNT "Microsoft Windows "
a. Press ENTER.
Setup examines the disks, and then completes the repair process.
For more information about the emergency repair feature, click the following article number to view the article in the Microsoft Knowledge Base:
If Setup Cannot Locate Windows
If you do not have a Windows Emergency Repair Disk, and if Setup cannot locate the Windows installation, follow these steps:
1. Start Windows Setup.
2. On the Setup will install Windows on partition page, select Leave the current file system intact (no changes), and then press ENTER.
3. Press ESC to install Windows to a new folder.
4. In the Select the folder in which the files should be copied box, type \tempwin, and then press ENTER.
Setup installs a new copy of Windows.
5. Log on to the new copy of Windows.
6. Click Start, and then click Run.
7. In the Open box, type cmd, and then click OK.
8. At the command prompt, type drive:, where drive is the boot drive of the computer, and then press ENTER. For example, type c:, and then press ENTER.
9. Type attrib -h -r -s Boot.ini, and then press ENTER.
10. Type edit Boot.ini, and then press ENTER.
Edit.com opens a Boot.ini file that is similar to the following file:
11. [boot loader]
12. timeout=30
13. default=multi(0)disk(0)rdisk(0)partition(1)\TEMPWIN
14. [operating systems]
15. multi(0)disk(0)rdisk(0)partition(1)\TEMPWIN="Microsoft Windows 2000 Professional" /fastdetect
16.
17. Replace all instances of TEMPWIN with WINNT. The Boot.ini file that appears is similar to the following file:
18. [boot loader]
19. timeout=30
20. default=multi(0)disk(0)rdisk(0)partition(1)\WINNT
21. [operating systems]
22. multi(0)disk(0)rdisk(0)partition(1)\WINNT="Microsoft Windows 2000 Professional" /fastdetect
23. Press ALT+F, and then press S.
24. Press ALT+F, and then press X.
25. Type attrib +h +r +s Boot.ini, and then press ENTER.
26. Type exit to quit the command prompt.
27. Restart the computer.
28. At the Please select the operating system to start screen, use the ARROW keys to select Microsoft Windows, and then press ENTER.
29. Start Windows Explorer, locate the following folders, and then delete them:
Tempwin
All Users.Tempwin
How To Create a Custom Boot Logo for Vista
CUSTOM BOOT LOGO FOR VISTA
First, download and install the freeware Vista Boot Logo Generator. This helps
creating the correct logo image type. Then select a bitmap image, and then save it
on your desktop. Choose two 24 bit .bmp versions of this image. One needs to be
800×600, and the other has to be 1024×768.Now take ownership of the file as
follows. You should open an administrator command prompt. To do this, type cmd in
the start menu search box, AND HIT Ctrl+Shift+Enter. Now Run this command: takeown
/f C:\Windows\System32\en-US\winload.exe.muiThen Run the following command: cacls
C:\Windows\System32\en-US\winload.exe.mui /G username:FAfter doing this, copy
(overwrite) the created file, in your C:\Windows\System32\en-US\.Lastly, type
msconfig in the start search bar and hit enter.Under the Boot Tab, check the “No
GUI boot” option and click Apply/OK. Reboot. It is advisable to always create a
System Restore point, first!
Disk Boot Failure Trobule shooting
Disk boot failure
How to overcome Disk boot failure.
This issue could be caused by any of the below possibilities.
Boot options are not set properly in CMOS
Non bootable CD or CD-R in computer
All boot devices set are not bootable
Boot options are not set properly in CMOS
Verify that the boot options within CMOS are set properly. Below is an example of
how we recommend the boot options be set. Floppy drive
CD-ROM drive
Hard Drive
Other / Network
Non-bootable CD, CD-R, DVD or other disc in computer
Verify that no CD, CD-R, DVD, or other disc is in the computer possibly causing the computer to attempt to boot from that disc.
All boot devices set are not bootable
If all of the above recommendations have been attempted and you encounter the same issue it is likely that the computer is not detecting any devices in the computer that are bootable. Attempt to boot from a bootable floppy disk.
If you are unable to boot from a known bootable floppy diskette, ensure that the floppy drive is properly setup. Once you are able to boot from a bootable floppy diskette, ensure that the hard disk drive is able to be read.
Bios chip And Bios Recovery
The BIOS Chip and BIOS Recovery
The BIOS Chip and BIOS Recovery
Before 1990 or so BIOSes were held on ROM chips that could not be altered. As its complexity and need for updates grew, BIOS firmware was subsequently stored on EEPROM or flash memory devices. The first flash chips attached to the ISA bus. Starting in 1998, the BIOS flash moved to the LPC bus, a functional replacement for ISA, following a new standard implementation known as "firmware hub" (FWH). In 2006, the first systems supporting a Serial Peripheral Interface (SPI) appeared, and the BIOS flash moved again.
EEPROM chips are advantageous because they can easily be updated by the user; hardware manufacturers frequently issue BIOS updates to upgrade their products, improve compatibility and remove bugs. However, the risk is that an improperly executed or aborted BIOS update can render the computer or device unusable. To recover from BIOS corruption, some new motherboards have a backup BIOS (i.e. they are referred to as "Dual BIOS" boards, Gigabyte even offers a motherboard with quad BIOS). Also, most BIOSes have a "boot block" which is a portion of the ROM that runs first and is not updateable. This code will verify that the rest of the BIOS is intact (via checksum, hash, etc.) before transferring control to it. If the boot block detects that the main BIOS is corrupted, then it will typically initiate a recovery process, by booting to a removable device (floppy, CD or USB memory) so that the user can try flashing again.
Due to the limitation on the number of times that flash memory can be flashed, a flash-based BIOS is vulnerable to "flash-burn" viruses that repeatedly write to the flash, permanently corrupting the chip. Such attacks can be prevented by some form of write-protection, the ultimate protection being the replacement of the flash memory with a true ROM.
Bios Failure Trobule shooting
Problem: The BIOS fails to detect the hard disk(s), CD-ROM, floppy drive, etc.
Cause: All of a sudden, hard drives and floppies disappear from the list of devices, or you cannot boot because the BIOS declares that you have no hard drive!
Solution: The most common reason for this error is a bad or loosely connected cable or incorrect jumper settings on the device. Check all the cable connections to the device. Ensure that the data cable and the power cable are properly plugged in both to the device and to the motherboard. Next, check the jumper settings. If two disks are connected to a single port, make sure one is set to Master and the other to Slave. Also check the BIOS setup program and ensure that IDE controllers are enabled. Go to the Integrated Peripherals menu and confirm that the Primary and Secondary Channels are enabled. If you are not comfortable changing individual values, reset the settings using the “Load Fail-safe (or Factory) Defaults” option.
Problem: After powering off the PC and switching it back on after a few hours, the time has changed
Cause: The CMOS battery powers the real-time clock. This symptom indicates that the battery is dying. In rare cases, it could also mean there’s a problem with the battery port of the CMOS. Solution: Replace the battery. If the symptom persists, there’s a good chance that the battery port is damaged. In this latter case, you may need to replace the motherboard! Get it checked by a computer technician first.
Problem: An error message says there is a problem with IRQ, I/Oport, DMA configuration or resource allocation, and refers totroubleshooting the BIOS
Cause: The BIOS configures and allocates resources to the IRQ,and I/O ports. In most BIOSes, this allocation cannot be changed or modified by the user. Some BIOSes may provide a “soft menu” to change these allocations.
Solution: It’s preferable to get the BIOS checked by a computer engineer. Use the “Load Fail-safe (Factory) Defaults” options in the setup menu. If a soft menu is available, ensure you read up the associated documentation before changing any settings.
Problem: An error message asks to update the BIOS
Cause: The BIOS firmware does not support the device without an update.
The BIOS fails to detect the hard disk(s), CD-ROM, floppy drive,
Problem: The BIOS fails to detect the hard disk(s), CD-ROM, floppy drive, etc.
Cause: All of a sudden, hard drives and floppies disappear from the list of devices, or you cannot boot because the BIOS declares that you have no hard drive!
Solution: The most common reason for this error is a bad or loosely connected cable or incorrect jumper settings on the device. Check all the cable connections to the device. Ensure that the data cable and the power cable are properly plugged in both to the device and to the motherboard. Next, check the jumper settings. If two disks are connected to a single port, make sure one is set to Master and the other to Slave. Also check the BIOS setup program and ensure that IDE controllers are enabled. Go to the Integrated Peripherals menu and confirm that the Primary and Secondary Channels are enabled. If you are not comfortable changing individual values, reset the settings using the “Load Fail-safe (or Factory) Defaults” option.
Problem: After powering off the PC and switching it back on after a few hours, the time has changed
Cause: The CMOS battery powers the real-time clock. This symptom indicates that the battery is dying. In rare cases, it could also mean there’s a problem with the battery port of the CMOS. Solution: Replace the battery. If the symptom persists, there’s a good chance that the battery port is damaged. In this latter case, you may need to replace the motherboard! Get it checked by a computer technician first.
Problem: An error message says there is a problem with IRQ, I/Oport, DMA configuration or resource allocation, and refers totroubleshooting the BIOS
Cause: The BIOS configures and allocates resources to the IRQ,and I/O ports. In most BIOSes, this allocation cannot be changed or modified by the user. Some BIOSes may provide a “soft menu” to change these allocations.
Solution: It’s preferable to get the BIOS checked by a computer engineer. Use the “Load Fail-safe (Factory) Defaults” options in the setup menu. If a soft menu is available, ensure you read up the associated documentation before changing any settings.
Problem: An error message asks to update the BIOS
Cause: The BIOS firmware does not support the device without an update.
Solution: See the Updating the BIOS section
Troubleshooting the Blue Screen
Troubleshooting the Blue Screen Of Death
One of the most dreaded error messages for a Windows user is the blue screen, or the
Blue Screen of Death (BSOD) as it is popularly known, which suddenly pops up
informing you that something is seriously wrong with Windows. What this screen
essentially means is that Windows has crashed and needs to reboot to recover.
Usually, you will be able to recover and continue without any problems, but it can sometimes be a hair-raising experience—like when you’re pressed for time and have to get that PowerPoint presentation ready for your boss!
Windows 9x/ME
In Windows 9x/ME this error is less serious but more common. You can usually recover from the error by simply pressing [Ctrl] + [Alt] + [Del] and restarting the computer, or by switching off the PC and switching it back on. However, the error message will contain very little information that you can use in troubleshooting.
Problems causing the BSOD
The BSOD is the main way for virtual device drivers to report a problem. The error description will state that Windows faced a problem (exception) at a particular memory address (a portion of the RAM) in a certain file, usually with the prefix VxD (virtual device driver), or the file name may have the DLL extension. At the minimum, it indicates that there was a problem with that particular file. Typically, this may have been caused by some action of the user that Windows does not allow—like accessing a document from a floppy and then removing the floppy before closing document. In other cases it may indicate that there is a problem with a particular software or hardware. If the BSOD repeats with the same message, then there is potentially something seriously wrong, and you should investigate further.
The basic approach
Use the file name in the error message to give you a clue as to what is causing the problem. Search the hard disk for the filename and look at the folder in which the file is located to give you an idea of which software program or hardware uses this file. Also search the Internet for any information on this file. Once you have identified the software or hardware associated with the filename, uninstall or remove the software or hardware. Verify that the software or hardware, as the case may be, is compatible with your version of Windows. Get updates if applicable and reinstall it. Also, see the Troubleshooting Startup, Shutdown and Power Management sections in this guide.
System Restore in Windows ME and Windows XP
In addition to the above, Windows ME/XP provides the extremely useful System Restore tool. System Restore takes daily snapshots of the system state—every 10 hours the system is on and every 24 hours of real-time. The snapshot contains all the information required to restore the system to that particular point in time. To restore the system to a previous point in time do the following: o Go to Start > Programs > Accessories > System Tools > System
Restore. o Choose “Restore my computer to an earlier time” and click Next. o On the calendar on the left, choose the last day you remember that Windows operated without problems. On the right, choose the Restore Point description; if there are multiple restore points that day, choose the one you’re most certain about or choose the latest time. Click Next. o Make sure you’ve closed all open files and running programs, and click OK. oThe system will roll back to the settings of that restore point and you can continue working normally.
Windows 2000/XP
Error reporting in Windows 2000/XP is more robust, nevertheless,hen you get a BSOD, it is just as mysterious at first glance. The “Windows Stop Message”, which is the official name for the BSOD, occurs when Windows encounters a problem from which it cannot recover. At this moment Windows stops and displays the error message shown on the screen. Additionally, the contents of the system memory are dumped to a file. This memory dump file can be analysed by competent support technicians to troubleshoot the problem in depth. All the stop errors are numbered according to the circumstances that caused the error. This is a big step up from Windows 9x/ME, where the stop errors were more generalised and hence were much more difficult to troubleshoot.
Problems causing the BSOD
The BSODs are generally associated with five problems faced by Windows:
o Software or device drivers may have a problem
o A hardware device is malfunctioning, or was removed while Windows was running, or does not fully support Windows. On older machines, outdated BIOS information can also cause errors.
o Hardware or hard disk errors during installation of Windows.
o Corrupted startup files, hardware and driver software during Windows startup can also be the cause. This type of error will always require troubleshooting before Windows can start up normally.
o Intermittent errors that appear randomly. These can be caused by an overheating processor, a defective memory system, a dying or dead hard disk, or faulty software and device drivers.
Possible solutions to the BSOD
When a BSOD occurs, the first step is to note down the Stop number, the ‘friendly name’ of the error and also the name of the file that is reported as the cause of the problem. The Stop number will be in hexadecimal format—something like this:
STOP : 0x0000000A (0xDB000000, 0x00000001, 0x00000002, 0xB04FB0DB)
The friendly name will be something like this:
IRQL_NOT_LESS_OR_EQUAL
If the error comes up very briefly, before you can note it down, and the system restarts, you will need to change a setting to tell Windows not to automatically reboot. Right-click My Computer, select the Advanced tab, and click “Startup and Recovery”, in Windows 2000, clear the “Automatically Reboot” checkbox. In Windows XP, click Settings and clear the “Automatic Restart” checkbox. This, of course, assumes that Windows has rebooted normally and you are able to change the setting.
If you are not able to boot normally, restart Windows and press [F8] repeatedly during the POST cycle. This will take you to the Advanced Options menu. Choose Safe Mode. Windows will attempt to load with a minimum set of drivers. If Windows is able to boot into Safe Mode, this most likely means that the problem is with a particular software, and is not hardware-related. If Windows is not able to boot into Safe Mode, restart the computer, bring up the Advanced Options screen (by pressing [F8] during POST) and select “Last Known Good Configuration”. Windows will then attempt to load the last settings where everything worked normally. If that doesn’t work, then it most likely means you have a serious hardware or critical startup system file error. If this error has occurred after any recent hardware additions, remove the hardware and try to boot again.
If you are able to boot into Safe Mode, first perform a virus and spy-ware scan using a tool such as Norton AntiVirus and Spybot S&D. Uninstall any recently added software, and remove or roll back any updated device drivers. (To roll back device drivers, go to the Properties page of the device in Device Manager, select the Driver tab, and click Roll Back Driver). In XP, you can perform one additional step—running System Restore, as explained above for Windows ME.
Restart the computer normally and check if the problem recurs. If it is an intermittent problem, and occurs at random, you can note down the error number the next time it occurs, since you disabled Automatic Restart after a crash. Boot into Safe Mode and see if you get the same random error. If you do, then the problem is likely hardware-related. Resolve the issue by following the hardware troubleshooting steps explained below. If the error only occurs in normal mode, then it is likely a software problem. Follow the steps for software and device driver troubleshooting described below.
Look in Device Manager and troubleshoot any hardware device conflicts as explained in the Troubleshooting Hardware Device Conflicts in Windows section. You can remove or disable the device, or roll back its driver to a previous version.
If the BSOD is caused by a faulty program that crashes Windows at system startup, you can disable the software from starting up by using msconfig.exe. Type Start > Run, type in “msconfig” and press [Enter]. Select the Startup tab and disable any or all software you think may be the ones causing the problem. Better still, you could disable all the software in the list, enable them one at a time, and reboot the computer to identify the offending software.
If the BSOD is caused by faulty hardware, remove any recently added hardware—after switching off the PC, of course! If the BSOD still occurs, or there are no newly added hardware, test the RAM for errors by using a memory diagnostic program such as Windows Memory Diagnostic (http://oca.microsoft.com/en/windiag.asp). See the Memory section of this guide for further information. If the diagnostic reports errors, then you’ve found the culprit. Replace the defective RAM.
If the BSOD is due to corrupt system startup files, you can repair Windows by performing a Repair Install. Boot the PC from the Windows installation CD, press [Enter] to set up Windows XP, press [F8] to accept the license agreement, and then press [R] to start the Repair Installation. Windows will reinstall all the system files and redetect all the hardware. Note: You will have to visit the Windows Update site to reinstall any patches and Service Packs, since the repair installation will remove them.
If you are still getting BSODs, switch off the PC, open the cabinet and remove all but the essential hardware: the mouse, keyboard, hard disk, CD-ROM, display card and RAM, along with the PSU and processor of course! Now, first attempt booting into Safe Mode, and if that works, reboot normally. If you are successful, the problem is with one of the peripheral devices. Add all the peripherals back one by one till you get a BSOD again—the last added peripheral is the culprit.
If you are getting BSODs during installation, then the problem could be with the RAM, hard disk, processor, or one of the peripherals. Test the RAM using a memory diagnostic tool as described above, check the hard disk for errors (most hard disk manufacturers provide software utilities that can diagnose errors), verify that the CPU is not overheating by following the instructions in the Motherboard section of this guide, and remove all peripherals and run the installation with the minimum configuration as described above. If the installation is successful, you can troubleshoot the rest of the hardware devices from within Windows.
Subscribe to:
Comments (Atom)